MorphoNet Virtual Reality
The MorphoNet windows standalone allows to experiment with a Virtual Reality version of MorphoNet for data visualisation. Here is how to use the VR mode:
Prerequisites
The MorphoNet VR mode has been tested on the Meta quest 2 and the HTC Vive. It should be compatible with any VR device supporting OpenXR but for an optimal experience, we recommend that you use these devices. Do not hesitate to send a message in the feedback menu for any bugs, or any issues with other VR devices.
Down below are the prerequisites depending on your device.
-
Meta quest 2:
-
Install the oculus application on your computer here. Launch it and make sure the application recognizes your headset.
-
Put on your headset. in the settings menu, activate the Quest link option and connect to your computer.
-
Once you are in the Quest link "white room", MorphoNet VR is ready to be used.
-
HTC VIVE:
-
Download and install Steam. Once it is installed, install SteamVR.
-
Plug in and setup the VR headset following the instructions in the SteamVR app.
-
Once you are in the steamVR room in the headset, MorphoNet VR is ready to be used.
Starting MorphoNet VR
To view a dataset in VR mode, simply load any dataset. Once it has loaded, click on the VR button on the top-right of the screen. If the button is greyed out, it means your VR headset is not properly setup (please refer to the prerequisites part above)

Controls
The VR mode intents to implement most of the features of the 3D viewer onto a VR interface. Here is the list of the controls specific to the VR version. For this section, the right and left trigger will be the only buttons used, no matter which VR device you are using, and they are the buttons that you can press with your index fingers.
-
Selecting / unselecting objects: with the sphere on your right controller, simply touch any object that you want to select. To unselect objects, touch them while you are pressing the right trigger.
-
Scaling and rotating the dataset: To scale and rotate the dataset, press both triggers. to scale up, move your hand apart. to scale down, move your hands closer. to rotate the embryo, rotate your right wrist, as if you were holding the dataset in your right hand. There is an alternate rotation method, that will be explained in better detail in the options section.
-
Changing time steps: if your dataset has several time steps, in addition to the slider on the left hand menu (more on this later), you can maintain the left trigger pressed, and do a quick motion towards the left with your hand (as if opening a door) to go backwards in the time steps, and a motion to the right to go forwards in the time steps
-
interacting with the left-hand menu: To click on a button on the left-hand menu, simply move the sphere located on the right hand on the button you wish to press.
-
Collapsing a submenu: by pressing the "v" button on the top-right of the submenu it will collapse.
-
Locking a submenu in space: By clicking on the pin button on the top-right of a submenu, it will lock it in place. press the button again to unlock it.
You will also notice that the Desktop controls are still available. Any operation that you apply using the regular interface also applies to the VR mode.
The left-hand menu

In the VR mode, you will find a menu attached to your left hand. it allows to have similar interactions to the main menus of MorphoNet. Here is a description of the menus, and a link to the corresponding menus in regular MorphoNet.
Apart from the toolbar, that is always active, all menus open by clicking on the corresponding blue button on the left-hand menu.
The toolbar
The toolbar on the left of the menu replicates the side toolbar of the main viewer. It works as follows:
| Button | Function |
|---|---|
 |
Selected objects counter: lists the amount of selected objects (cannot be interacted with) |
 |
Toggle laser pointer selection: allows to toggle on or off the laser pointer selection. While activated, you can point and press the trigger to select/unselect objects in your dataset. |
 |
Inverse selection: Inverts the actual selection. Will make all unselected objects selected and vice versa |
| Clear selection: Unselects all selected objects | |
 |
Display all selected objects: Makes all selected objects visible. When in doubt, or if you have hidden objects and wish to make them all visible again, press the clear selection button to clear the actual selection, then click on the invert selection button to select all objects, and click on this button to make all visible |
 |
Hide all selected objects: Hides all selected objects. |
 |
Apply a random Label to selected objects: Gives a random label (and color as a result) to all the selected objects. |
The transformation menu
The transformation menu replicates the Dataset menu of the main viewer. it works as follows:
![]()
| Button | Function |
|---|---|
 |
Resets the base scaling and rotation of your dataset |
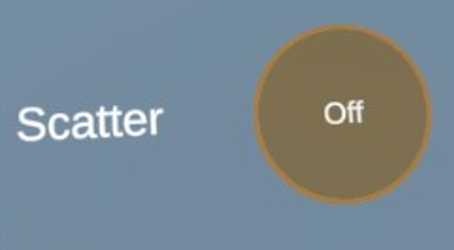 |
Toggles on or off the scattering. if on, press the right trigger and do quick motions to the right to scatter the dataset, or to the left to put in back together |
 |
Resets the dataset to no scattering |
 |
Toggles on or off the cutting plane. if on, press the right trigger and move your hand around as if the cutting plane was attached to it |
 |
Resets the base position of the cutting plane |
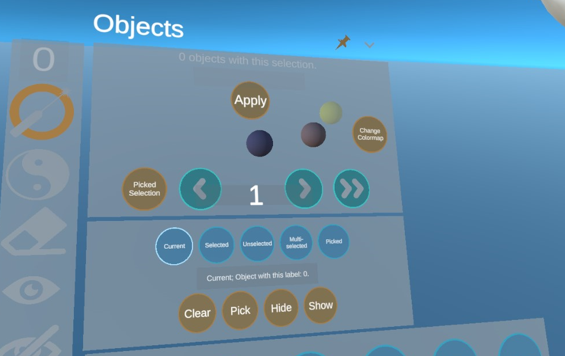
The Objects Menu
The objects menu replicates the Labels menu of the main viewer. It works identically, and we suggest to look at the menu documentation to get a better idea of who to use it.
The infos menus
The infos menu replicates the Properties menu of the main viewer. It works as follows:
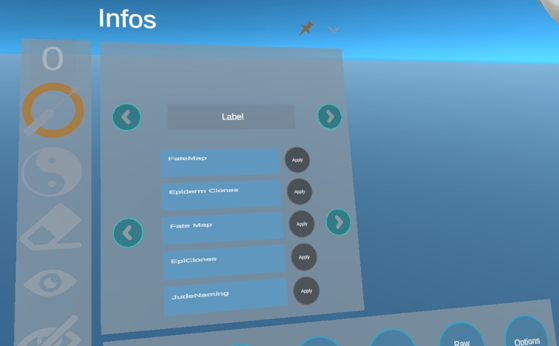
| Button | Function |
|---|---|
 |
Allows you to select between float or label properties (other types not supported on the VR mode at the moment). By clicking on a property, then by clicking on the button that appears you can display it. for float properties, it opens an additional menu to manage the colorbar |
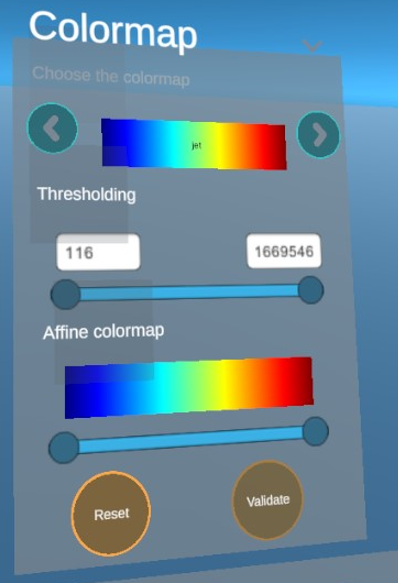 |
This menu allows you to customize the colorbar on your float information. It works like the Label menu |
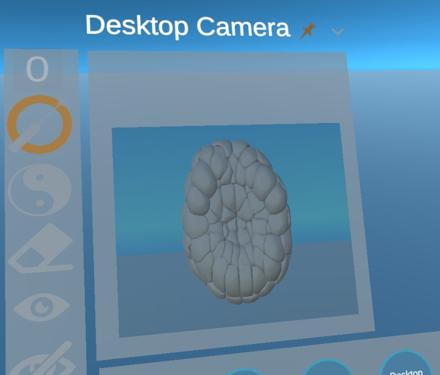
The Desktop camera menu
The desktop camera menu allows you to see what is currently seen on the desktop app morphonet, which can be useful in demonstration purposes.
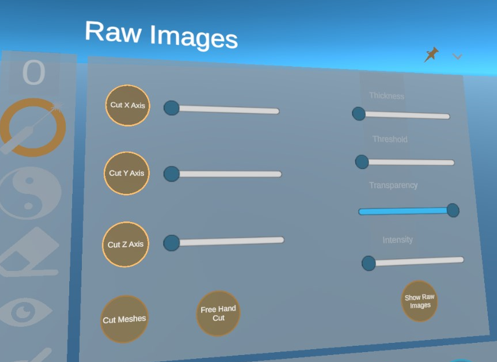
The Raw Images menu
This menu allows to view and manipulate raw images on datasets. It works like the raw images section of the dataset menu in the main viewe
the options menu
The options menu allows you to try an alternate interaction method. when activated, it Allows you to rotate the dataset using your two hands instead of just the right hand, as if you were holding it with two hands.
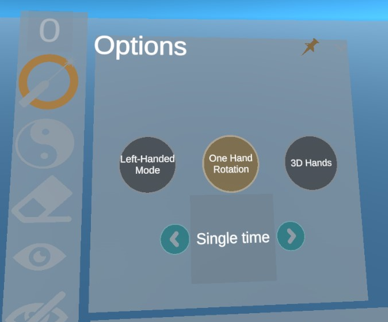
It also allows you to view the dataset with all time steps. You can have an helicoid, and a circular view, or the regular view with just a single time step.