Create your own plugin
As a developer, you can create your own image processing plugin, and integrate them into the curation module of your MorphoNet install.
Before you start, a few concepts you have to know:
-
MorphoNet is an application composed of several modules. There is the main Application, and a python backend for the curation module. The two modules communicate with each other (as well as with the lineage window) to make the full application.
-
MorphoNet comes with a pre-built python environment so it can function without an already installed python environment. To be able to make your own pluginw will need to run the python backend on a python environment on your computer.
Setup
To begin, you must first have a 3.9 python environment installed on your computer.
Then, you will have to install a local and editable version of the MorphoNet python API. To do that, you will have to:
- Start my installing the MorphoNet python API. This way you have all the dependencies installed. In a terminal, with your python environment activated, you can do so with the command:
pip install morphonet
- Start by cloning the MorphoNet API git repository on your computer. You can do so with the following line in a terminal:
git clone https://gitlab.inria.fr/MorphoNet/morphonet_api.git
- Then you must have an editable version of your local python API. This way, you can edit locally the code of the API to implement your own plugin.
#go in the morphonet_api local folder:
cd ./morphonet_api
# install a local and editable version of the API
pip install -e .
- Once the installation is done, you can already launch th MorphoNet Standalone with your local API. Before showing you how to make your plugin, we will show you how to run MorphoNet with a local versoin of the API.
Running MorphoNet with a custom API
Once you followed the above instructions, you can start by running MorphoNet with your local API.
-
Start by downloading the latest stable version of MorphoNet here.
-
Launch the MorphoNet Application. You will see the main window open, as well as a terminal window. The terminal window is the pre-built packaged API environment deployed in the appication.
-
Only after teh app has been launched, on a terminal with your python environment activated, go to your local API repository, then run the following commands:
cd ./build-standalone
#run the standalone python backend
python MorphoNet_Standalone.py
-
Doing so will "take over" the terminal window by a version of the backend running on your python environment, with a version of your local API. You can close the terminal window optionally, but the process will be closed automatically anyways.
-
You can now use the MorphoNet standalolne as you would normally. PLEASE NOTE: if you update the MorphoNet application, you should also update the git repository of the API, to make sure the rest of the API is up-to-date. to do this, run "git pull" in a terminal in your local repository.
Making your own plugin
Now that you can run MorphoNet with a local version of the API, you can start to add a new plugin. To show you how to to that, we will see an example of a new, very simple plugin. We will show you how to create a sample plugin to perform a global segmentation of a dataset, and essentially remove the background. The plugin will function on intensity images.
After the example, you will see the main functions used in the plugins to interact with the segmentations/intensity images of your dataset.
BackgroundDetector plugin
First, we will create a BackgroundDetector.py file in the API, in the path "morphonet_api/morphonet/plugins/CreateSegmentation/". We chose the CreateSegmentation familiy of plugins since it will create a basic segmentation for our intensity images. If you create your own plugin, you shound select a directory that reflects the function of your plugin (creating seeds, editing segmentations, etc.)
To add your new plugin to the list of Plugins in MorphoNet, add these lines in the __init__.py file in the plugin family folder (here: morphonet_api/morphonet/plugins/CreateSegmentation/__init__.py)
In the BackgroundDetector.py, put the following code:
#!/usr/bin/env python3
import numpy as np
from morphonet.plugins import MorphoPlugin

class BackgroundDetector(MorphoPlugin):# The plugin has to heritate from the MorphoPlugin class

    def __init__(self): #PLUGIN DEFINITION
        MorphoPlugin.__init__(self)
        self.set_name("Background Detector") #Set the Name of the plugin
        self.set_parent("Create Segmentation") #Set the type of plugin
        self.set_description("This plugin perform a segmentation of the background") #Set a description
        self.add_inputfield("Voxel Offset", default=10) # Define plugin variables

    def process(self, t, dataset, objects): #PLUGIN EXECUTION
        if not self.start(t,dataset,objects,objects_require=False): #Start function required
            return None

        from skimage.morphology import binary_dilation,binary_erosion
        from morphonet.tools import printv
        offset = float(self.get_inputfield("Voxel Offset")) #Retrieve the paramets value
        rawdata = dataset.get_raw(t) #Retrieve the raw data at this time point
        (unique, counts) = np.unique(rawdata, return_counts=True) #Look at the pixels distribution
        idx = np.where(counts == counts.max()) #Take the one which the highest number (supposed that the images contains mainly background...)
        background=unique[idx][0] #Get the value of the background
        printv("Found background value at "+str(background),0) #Send the message to the 3D viewer
        background_mask=rawdata<background+offset #Create a firsrt mask of the background
        background_mask=binary_erosion(binary_dilation(background_mask)) #Remove some noise
        data=1-background_mask # We want the inverse the mask of the background
        data[data == 1] = dataset.background+1 # make sure the new id will not be considered as background
        dataset.set_seg(t, data) # Set the segmentation as this time point
        self.restart() #Restart function required
- Once this is done, you can start your instance of "modded" MorphoNet as explained above. In the next images, we demo what the plugin does on a Phallusia mammillata dataset composed of an intensity image:
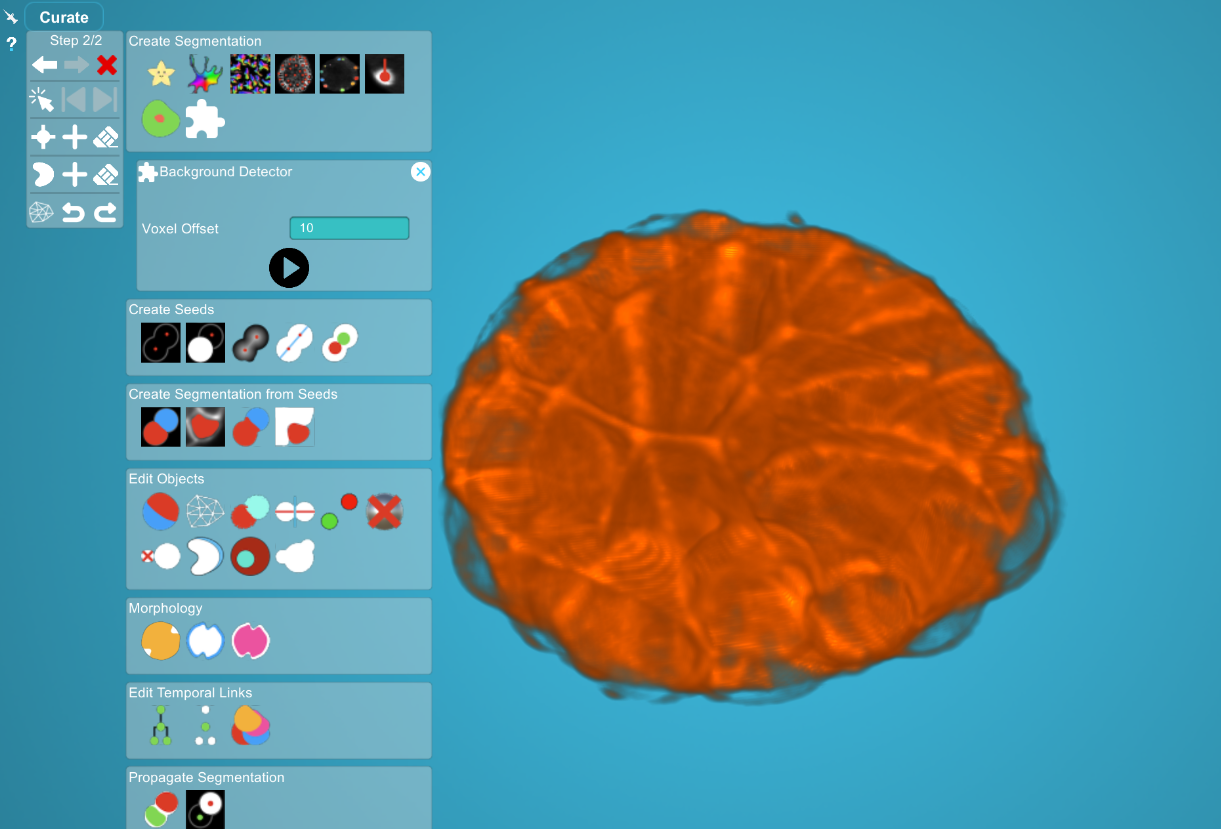
- Here you can see and image without any segmentation, and our new plugin in the create segmentation tab, with a sample icon. Click on the "play" button to launch the plugin:
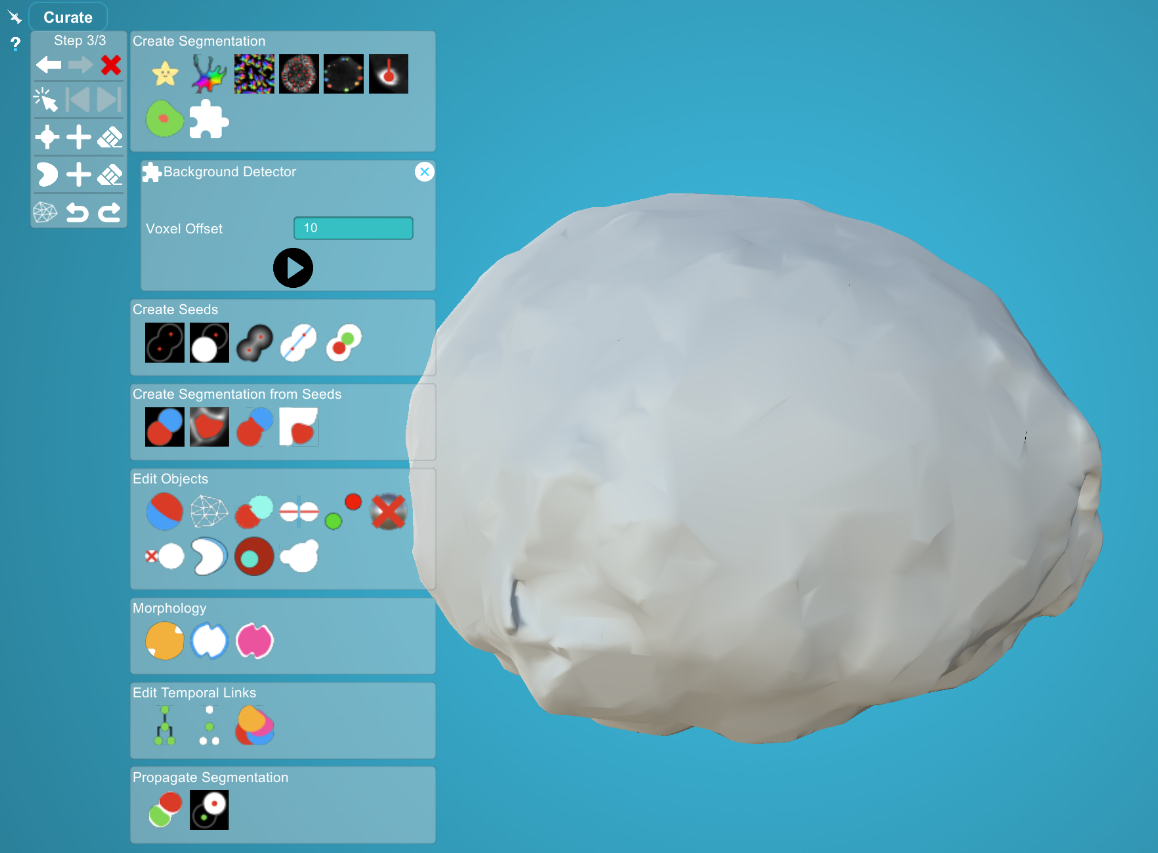
- And here you can see the segmentation created by the plugin, after it is done computing. This is but an example of what you can do as a MorphoNet plugin, and in the part below we'll walk you through the most important functions to know whan making custom plugins.
Creating your plugin: documentation
In the above tutorial, you saw how to make a custom plugin. Here we will make a brief documentation on the essential functions when making a custom plugin:
-
dataset.get_seg(time, channel):
- Returns: the 3D segmented image at time t and channel channel
- Parameters:
- time (int) : the time at which to get the image
- channel (int, default=0) : the channel at which to get the image
-
dataset.get_raw(time, channel):
- Returns: the 3D Intensity image at time t and channel channel
- Parameters:
- time (int) : the time at which to get the image
- channel (int, default=0) : the channel at which to get the image
-
dataset.set_seg(t, data, channel, cells_updated):
- This functions sets a new segmentation for time t and channel channel. This function should be called at the end of all yout plugins which create and or modify segmentations.
- Returns: Nothing
- Parameters:
- t (int) : time for which to save the segmentation
- data (np.array) : image to set
- channel (int, default=0) : channel for which to save the segmentation
- cells_updated (list, default=None) : list of MorphoNet.Object objects, which are the cells that have been updated by the algorithm. defaults as None if no cells (or all cells) have been updated. mostly used to make computing the new step quicker.
-
dataset.get_seeds_in_image(dataset, seeds):
- Returns: the 3D Intensity image at time t and channel channel
- Parameters:
- dataset (MorphoNet.Dataset) : the dataset on which to apply the plugin. pass the object in the parameter of the process function.
- seeds (object) : seeds object. Initialize it by adding the following lines :
...
    def __init__(self):  # PLUGIN DEFINITION
        MorphoPlugin.__init__(self)
        self.add_coordinates("Add a Seed") # required to get seeds later in the plugin execution
...
    def process(self, t, dataset, objects):  # PLUGIN EXECUTION
        if not self.start(t, dataset, objects, objects_require=False):
            return None

        seeds = self.get_coordinates("Add a Seed")  # Get list of seeds coordinates from MorphoNet seed system #must match with declaration in __init__() function
We encoourage you to get a look at the default MorphoNet plugins to see how to make custom ones.