MorphoNetJ Plugin Basic usage Help
Using the plugin
Once the plugin has been installed, start Fiji/ImageJ.
Open the Plugins tab, select the MorphoNet tab. This will open the main menu of the plugin, where you will be able to open the sub-plugins depending on what you want to do.
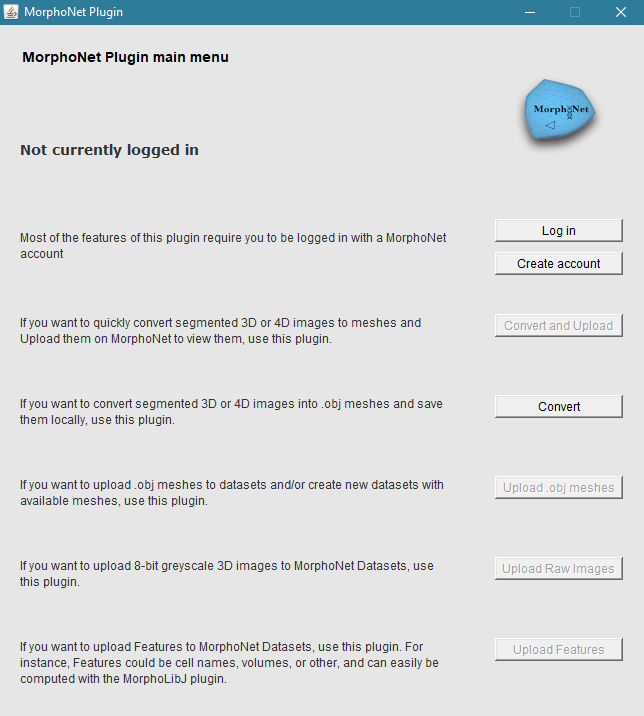
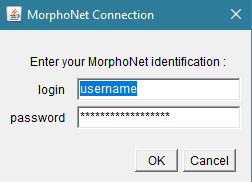
Most of the functionalities of this plugin require you to be logged in with a valid MorphoNet account. To log in, click on the Log in button and enter your credentials. Once logged in, you will be automatically disconnected by closing the main menu window, or you can click on the Disconnect button. If you do not posses a MorphoNet account, create one by clicking on the Create account Button
This plugin is divided in 5 sub-plugins :
-
The "Convert and Upload plugin", that allows users to quickly and simultaneously convert their segmented 3D/4D images to meshes, and immediately upload them to MorphoNet Datasets. It requires you to be logged in with a MorphoNet account.
-
The "Convert plugin", that allows you to convert segmented 3D or 4D images to .objs meshes and save them locally. The meshes created with this plugin can later be uploaded to MorphoNet using the "Upload meshes plugin". This plugins does not require a MorphoNet account.
-
The "Upload meshes plugin", that allows users to Upload meshes to MorphoNet datasets and/or create new dataset with existing meshes. It requires you to be logged in with a MorphoNet account.
-
The "Upload Raw images plugin", that allows you to upload 3D images to existing MorphoNet Datasets, that you can view alongside your meshes in the viewer. For instance if you view this dataset in MorphoNet, click on the Dataset tab and click on the "show" button of the Raw images menu, you will be able to see an example of the functionality. It requires you to be logged in with a MorphoNet account.
-
The "Upload Features plugin", that allows you to upload features to your datasets. You can upload features from a results array in Fiji (such as the ones generated by the MorphoLibJ plugin), or from a text File. For more info on how to format features, please refer to this page. It requires you to be logged in with a MorphoNet account.
Using the plugin to convert 3D/4D images and upload the data to Morphonet
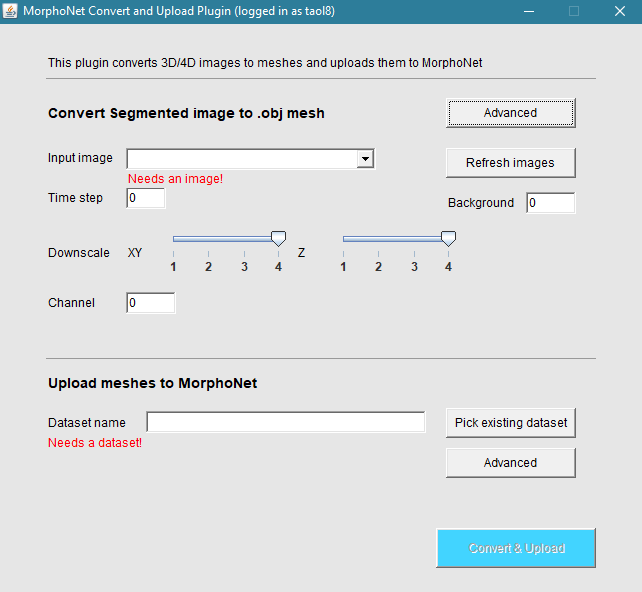
The "Convert and upload plugin" will allow you to convert your segmented images into meshes, and upload them to MorphoNet datasets.
To Use this plugin, you need a MorphoNet account.
Quick version :
If you want to quickly try out the plugin : First of all, log in using your MorphoNet credentials. Then, open a 3D/4D image on Fiji or ImageJ. Select it on the input image Field (use the Refresh images button if the selector is empty).
Finally, click on the Convert and Upload button and wait for the process to be over. You will be able to see your data on MorphoNet once you are logged in. You may then directly view your data on MorphoNet by clicking on the See on MorphoNet button.
Complete version
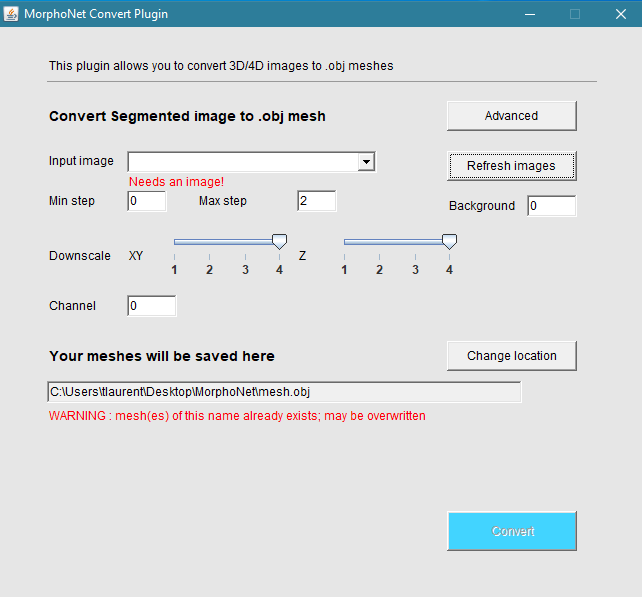
You must have at least one segmented 3D or 4D image opened on Fiji or ImageJ to use this plugin.
Then, select in image in the Input image field. This is the image you will Convert in 3D mesh(es), that will then be uploaded to MorphoNet.
If you load new images on Fiji/ImageJ, click the Refresh images button to refresh the interface with the new images.
Then, if you are using a 3D image, you will need to input the time step of the image (0 being the default value) in the Time step Field.
If you are working with a 4D image, you will need to input the minimum time step and the maximum time step you wish to convert and upload (it is filled by default with 0 being the first minimum time step, and the maximum as the last frame).
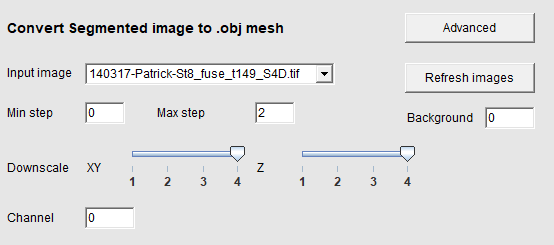
Then, select a downscaling factor for your data. this will downsample your image(s) by the scaling factor selected with the Downscaling sliders. For instance, a 512*512*512 voxels image with a downscaling factor of 4 will make it so the uploaded image is 128*128*128 voxels. It is recommended to have a scaled image under 256 voxels in the biggest dimension. a bigger factor scale will output a lower resolution mesh, but will be faster, and MorphoNet does not need Meshes of high resolution. There are two sliders for downscaling, the XY slider and the Z slider. these rescale the X and Y axis of your image and Z axis of your image differently depending on the value you give them. This is useful in the case where you have a high-resolution image in the X and Y axis, but few slices in the Z axis, and it allows for a more uniform quality of the final mesh.
You can also change the value of the Background Field. It defaults as the lowest value in your image, and every voxel of this value will not be considered as an element to convert. It should match the value of the background of your image if it does not automatically.
You can also change the value of the Channel Field. This will determine on which channel of your dataset the mesh you generate will be uploaded, and it defaults at the channel 0 (the first one). This parameter is written in the mesh file and will be automatically read upon upload to MorphoNet.
You can use the Advanced Button to access advanced options. The advanced menu is detailed at the end of this documentation.
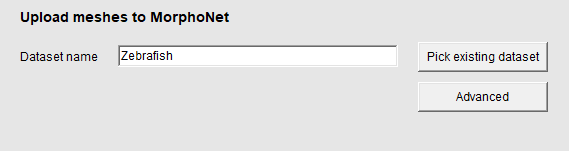
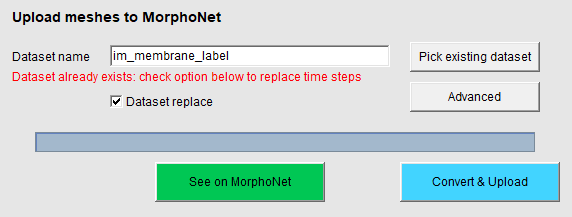
Finally, you have to Select a Dataset you will upload the mesh data to. You can create a new Dataset, or pick a dataset you already own on your account. By default, the plugin creates a dataset of the same name as your input image.
- To create a new Dataset, just input the name of your new dataset in the Dataset name field.
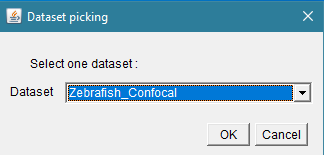
- To upload your data to an existing mesh you own, click on the Pick existing dataset button, and select a dataset in the window. Alternatively, you can write the name of your dataset in the field if you know it (this is case-sensitive).
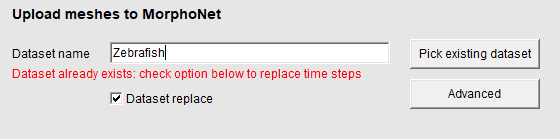
If you are uploading data to a Dataset you own that already exists, you will need to choose if you want to clear the existing data on the time steps you will upload. Check the appearing Dataset Replace checkbox if you want to clear data, or uncheck it if you want not to. Note that only the data previously present on the time steps you will upload will be replaced. For instance, if you upload a mesh on the time step "1" of a mesh you already own, and that this mesh only has data for the time step "0", nothing will be replaced. If you upload data for the time step 0 again however, the previous data will be replaced. By unckecking the Dataset Replace, it allows you to upload several files for one time step, which is useful when you have a very large mesh to upload, making it load in chunks instead of all at once.
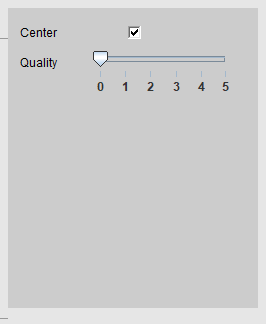
The Advanced button opens a sub-menu that allows you to have more control on the meshes you will be uploading. You can choose to center your mesh in the viewer on its center of gravity with the Center checkbox, and You can choose the quality at which you want to upload your mesh using the Quality slider. The default value is 0, and the higher value means better quality (This has no bearing on the actual quality of the mesh, it has to do with the quality you want to assign on morphonet.org)
Please note that only the meshes created by clicking the Convert and upload button will be uploaded to the dataset.
Finally, you can convert your image and upload the 3D data by clicking on the Convert & Upload button. You will be able to view your data in MorphoNet if you are logged in, by clicking on the See on MorphoNet button or directly on the website.
Converting segmented 3D/4D images to meshes:
You can use the "Convert plugin" to meshes to convert segmented 3D or 4D images to 3D Meshes. You do not need to have a MorphoNet account to use this plugin
The first step to view your data in MorphoNet using this plugin is to convert your segmented image data to meshes. The generated meshes will always be .obj files
To do so, select in image in the Input image field. This is the image you will Convert in 3D mesh(es), that will then be uploaded to MorphoNet.
If you load new images on Fiji/ImageJ, click the Refresh images button to refresh the interface with the new images.
Then, if you are using a 3D image, you will need to input the time step of the image (0 being the default value) in the Time step Field.
If you are working with a 4D image, you will need to input the minimum time step and the maximum time step you wish to convert and upload (it is filled by default with 0 being the first minimum time step, and the maximum as the last frame).
Then, select a downscaling factor for your data. this will downsample your image(s) by the scaling factor selected with the Downscaling sliders. For instance, a 512*512*512 voxels image with a downscaling factor of 4 will make it so the uploaded image is 128*128*128 voxels. It is recommended to have a scaled image under 256 voxels in the biggest dimension. a bigger factor scale will output a lower resolution mesh, but will be faster, and MorphoNet does not need Meshes of high resolution. There are two sliders for downscaling, the XY slider and the Z slider. these rescale the X and Y axis of your image and Z axis of your image differently depending on the value you give them. This is useful in the case where you have a high-resolution image in the X and Y axis, but few slices in the Z axis, and it allows for a more uniform quality of the final mesh.
You can also change the value of the Background Field. It defaults as the lowest value in your image, and every voxel of this value will not be considered as an element to convert. It should match the value of the background of your image if it does not automatically.
You can also change the value of the Channel Field. This will determine on which channel of your dataset the mesh you generate will be uploaded, and it defaults at the channel 0 (the first one). This parameter is written in the mesh file and will be automatically read upon upload to MorphoNet.
You can use the Advanced Button to access advanced options. The advanced menu is detailed at the end of this documentation.
Finally, your meshes will be saved to the path determined in the Mesh path text field. It defaults to a directory created in your desktop (in your user directiry on linux), But you can change it using the Select a Change location button. The created mesh(es) name(s) will be based on the name of the file you input in this text field, and it defaults as the name of your input image.
Once you are ready to convert your images, you can press the Convert Button to convert your images to meshes. You can follow the process if you open the console on Fiji/ImageJ in the Window>Console tab.
Once your meshes are generated, you can visualize them with the 3D viewer of your choice.
Uploading Your data to MorphoNet
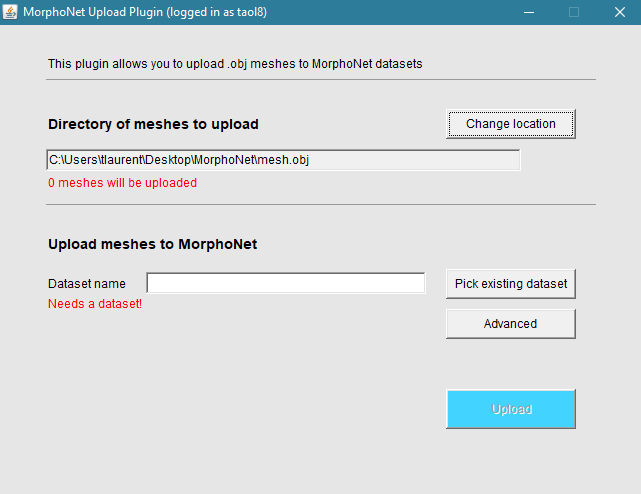
You can use the "Upload Meshes plugin" to upload your 3D meshes to MorphoNet datasets. You need to have a MorphoNet account to use this plugin.
Once you have generated mesh data, you can upload it to MorphoNet for viewing. You can create a new dataset and upload your meshes for it, or update a dataset you already created.
Please note that the meshes You will upload to a dataset will be ALL of the .obj files that exist in the directory of the mesh Path text field (this will default on the created directory on your desktop, or in your main user directory on linux). You can choose another directory using the Change location, but remove any meshes you do not want to upload from this directory before continuing.
Finally, you have to Select a Dataset you will upload the mesh data to. You can create a new Dataset, or pick a dataset you already own on your account.
- To create a new Dataset, just input the name of your new dataset in the Dataset name field.
- To upload your data to an existing mesh you own, click on the Pick existing dataset button, and select a dataset in the window.
If you are uploading data to a Dataset you own that already exists, you will need to choose if you want to clear the existing data on the time steps you will upload. Check the appearing Dataset Replace checkbox if you want to clear data, or uncheck it if you want not to. Note that only the data previously present on the time steps you will upload will be replaced. For instance, if you upload a mesh on the time step "1" of a mesh you already own, and that this mesh only has data for the time step "0", nothing will be replaced. If you upload data for the time step 0 again however, the previous data will be replaced. By unckecking the Dataset Replace, it allows you to upload several files for one time step, which is useful when you have a very large mesh to upload, making it load in chunks instead of all at once.
The Advanced button opens a sub-menu that allows you to have more control on the meshes you will be uploading. You can choose to center your mesh in the viewer on its center of gravity with the Center checkbox, and You can choose the quality at which you want to upload your mesh using the Quality slider. The default value is 0, and the higher value means better quality (This has no bearing on the actual quality of the mesh, it has to do with the quality you want to assign on morphonet.org)
Finally, once you are ready to upload your data to MorphoNet, just click on the Upload button. You can then go to MorphoNet and view your data once you are logged in. Alternatively, you can click on the appearing See on MorphoNet button to view your dataset directly.
Uploading images to MorphoNet datasets
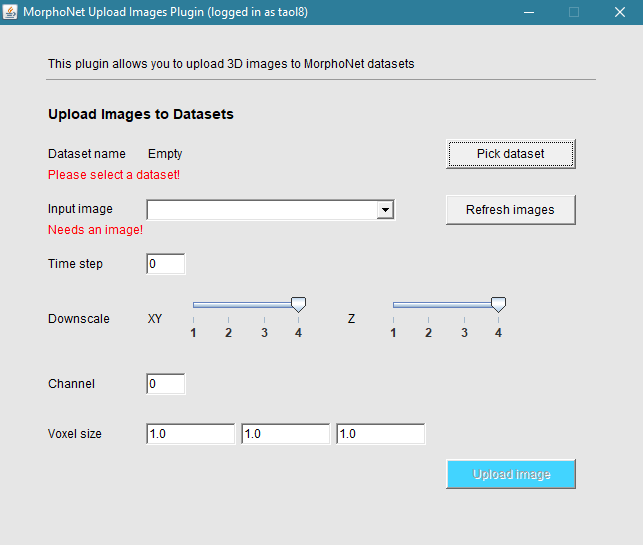
You can use the "Upload Raw images plugin" to upload 3D images on your datasets to visualize alongside your meshes.
You will need a MorphoNet account to use this plugin.
You also need to have opened a 3D or 4D image on Fiji. All the images you upload using this plugin need to be in 8-bit greyscale. You can convert them with Fiji by clicking on the image>Type>8-bit tab.
Once you are logged in, you first need to select a dataset on which to upload your images using the pick dataset button. The selected dataset name can then be seen next to the Dataset name label.
Then, you need to select an image using the input Image selector. If you open images on Fiji after having opened the plugin window, you can click on the Refresh images button to refresh the selector with the new images.
Then, you need to select the Time step of the dataset on which the image will be uploaded. You can upload any type of 3D image you want, but at the moment, only one image can be visible per time point of your datasets.
If you are using a 4D image as input, you will need to select the starting time step in the Time step field, as well as the max time step of the image you want to upload in the Max step field.
Then, select a downscaling factor for your image. this will downsample your image by the scaling factor selected with the Downscaling sliders. For instance, a 512*512*512 voxels image with a downscaling factor of 4 will make it so the uploaded image is 128*128*128 voxels. It is recommended to have a scaled image under 256 voxels in the biggest dimension. a bigger factor scale will output a lower resolution mesh, but will be faster, and MorphoNet does not need Meshes of high resolution. There are two sliders for downscaling, the XY slider and the Z slider. these rescale the X and Y axis of your image and Z axis of your image differently depending on the value you give them. This is useful in the case where you have a high-resolution image in the X and Y axis, but few slices in the Z axis, and it allows for a more uniform quality of the final image.
Then you have to select a channel on which the image will be uploaded (you can have as many images per time step as you want, represented by the different channels) using the Channel text field.
Finally, you have to select a Voxel size for your image using the Voxel size text fields. It is automatically filled by the default value of your image, but change it accordingly if you changed the value of the mesh it corresponds to. You should always try to have the same voxel size for an
You can then upload your 3D images using the Upload image Button. After a short wait, you will be able to see the result on MorphoNet using the See On MorphoNet button. To see your images, select a time step where you have uploaded an image, click on the "dataset" tab, and click on the "Show" button of the Raw images menu.
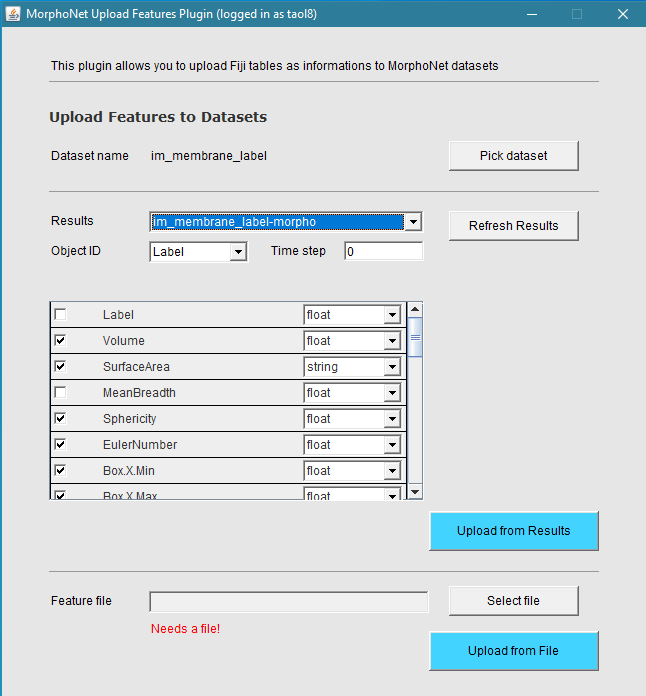
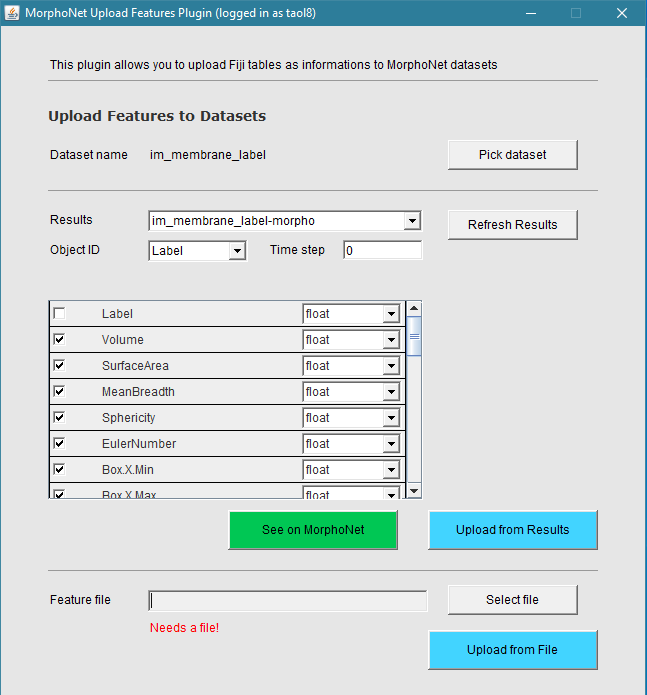
Uploading properties to datasets
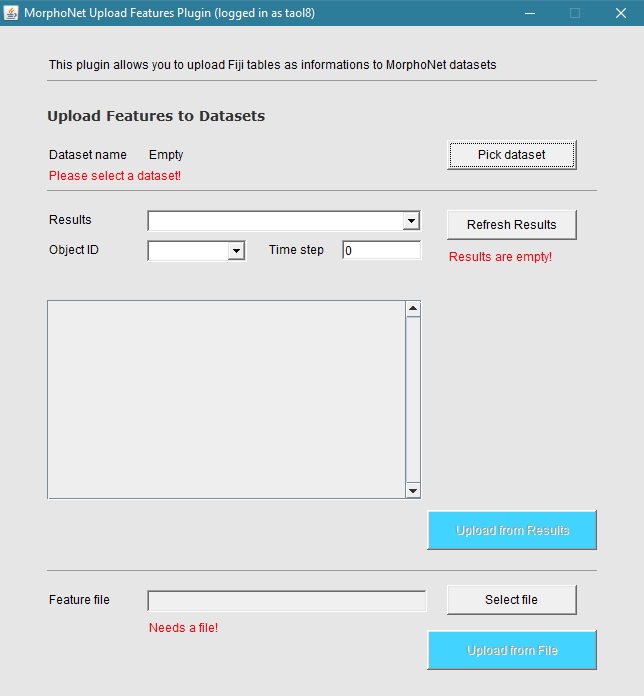
The "Upload features plugin" allows you to upload properties to your MorphoNet datasets. For more information on features, please refer to this page on the Information types and format part.
This plugin requires a valid MorphoNet account.
First off, start by selecting a dataset on which you will upload features.
This plugin allows you to upload properties in two ways : You can upload features from the results array on Fiji, or upload directly from a correctly formatted text file.
To upload from a Fiji Results array window, you must have at least one results window opened with relevant data. If you added data in the results windows or created a new window after having opened the plugin window, you can refresh the window by clicking on the Refresh results button. Start by selecting a window from which to select data with the Results selector.
For instance, to create a Results window, you can use the Fiji plugin MorphoLibJ, and use the Analyze>Analyze regions 3D tab to create an array of features for each label such as volume, surface area, bounding boxes coordinates, etc.
Then, you need to select the column of the object ID (the column of the indices) using the Object ID selector It defaults as the first column. Also select the time step for which you cant to upload features using the Time step Field.
You will then be able to see the list of all features available in your currently selected results window. you can change their type using the drop-down menu, and choose to upload them or not using the checkbox at the beginning of the line. For more information on feature types, please refer to this page on the Information types and format part.

Once you selected which features to upload, and gave them the correct type, click on the "Upload from results" button when you are ready to upload your features this way.
Alternatively, you can upload features from a text file that is already formatted properly. To do so, just select a file using the Select file button, and just upload it by pressing the Upload from file button.
The appearing See on MorphoNet button opens a tab with your dataset, on which you will be able to see your features. Alternatively, you can see your features in MorphoNet by opening one of your datasets, and selecting them in the Infos tab. you may need to download them first.
The advanced options menu
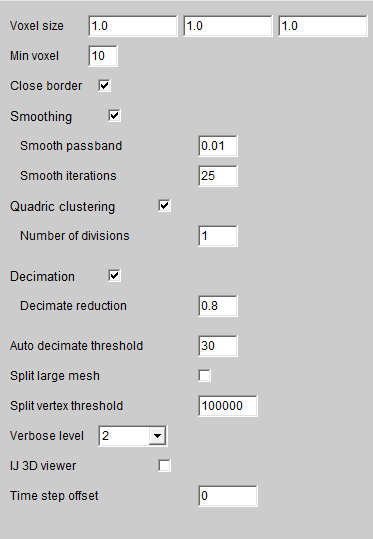
-
Voxel size : the Voxel size of your image. this field is automatically filled to match the selected image.
-
Min voxel : minimum amount of voxels of an element in your data. all elements containing less than this amount of voxels will be ignored.
-
Close border : adds a border to close elements adjacent to the sides of your images. If unchecked, your meshes wight have holes in them if the elements are on the side voxels of the image.
-
Smoothing : activates or deactivates the smoothing operation.
- Smooth passband : the passband of the smoothing. between 0 and 2, lower values produce more smoothing.
-
Smooth iterations : number of iterations of the smoothing process. 10 to 20 is usually recommended.
-
Quadric clustering : activates or deactivates the Quadric clustering operation.
-
Number of divisions : number of divisions along the X,Y and Z axis for the filter.
-
Decimation : activates or deactivates the Decimation operation.
-
Decimate reduction : reduction to the number of triangles.
-
Auto decimate threshold : This option allows you to calculate the optimale value for the reduction of the decimation of your mesh. It is the required minimum of points per element that we want. If the decimation operation would generate elements that have a lower amount of points than this threshold, the operation is repeated with a higher reduction parameter, which will generate meshes with more points. if it is not possible to obtain at least the number of points of the threshold, the decimation operation will be skipped. You can functionnaly disable this by setting the threshold to 0.
-
Split large mesh : This option allows you to enable or disble the splitting of large mesh in several files. the details of how this functions are just below with the Split vertex threshold option.
-
Split vertex threshold : If the above option is enabled, this is the amount of vertices from which we will cut the mesh in several parts. the splitting is made at the next element when the amount of vertices is reached, and if the threshold is reached again, another split will occur, and so on. This is very useful when you want to upload a very large mesh, but still want to see it load gradually instead of all at once after a large loading time. The lower the value, the bigger the amount of generated meshes will be.
-
Verbose level : Verbose for the Fiji/ImageJ console (0=none, 1=some, 2=all)
-
IJ 3D Viewer : will allow you to see your 3D mesh data from your image as it is created, though it will slow down the process significantly.
-
Time step offest : Only usable on 3D+t images, it allows you to add a starting offset for the time points of your dataset. For instance, if you want to upload a 3D+t image with 10 time steps, but you want the first time step to start as the 10th on your MorphoNet dataset, add an offset of 10.
F.A.Q.
-
I need to upload a large number of time steps at once, this tool is too slow : -> you can open all of your images in Fiji, and concatenate them by clicking on the Image > Stacks > Tools > Concatenate function built into Fiji. You can then convert and upload your 4D image into several time steps to MorphoNet.
-
The plugin does not work on macOS : -> make sure your Fiji install is in the /Applications folder.
-
My data looks like a big cube : -> This means that the background of your 3D image has been considered as an object in itself : you need to look at the value of your background in Fiji/ImageJ, an input this value in the background field of the "Advanced" options.
-
My data does not look at all like it should, and is empty or almost empty: -> This might mean that you tried to convert RAW data into a 3D mesh. The convert and convert & upload plugins only support segmented 3D or 4D data.
-
My uploaded data is incorrect : clicking on one cell selects several at the same time : -> this may be that yout data was incorrectly segmented, or fiji incorrectly opened your image. in the case where you have data where each cell is separated by the background, you can re-segment it using Fiji and the MorphoLibJ Fiji plugin. To do this, open your image on Fiji, and run the Plugin > MorphoLibJ > Binary Images > Connected Components Labeling, using the 26 connectivity option. You will generate the image with the correct segmentation.